You don’t want your sump pump to malfunction during a heavy rainstorm. Sump pumps are usually a crucial safeguard against flooded basements, substantial water damage, and exorbitant repair expenses. Without a working sump pump, your home would flood during storms, causing problems such as basement flooding and foundation damage. Luckily, several warning signals indicate that your pump is nearing the end of its useful life. Therefore, you need to learn to how to replace a sump pump before it’s too late. This article will guide you in doing so. Keep reading!
Can I Replace the Sump Pump on my Own?
Though replacing a sump pump may appear to be a difficult task, it’s a simple process that you can handle as a homeowner. Before installing the new sump pump, ensure that it’s the correct size for your sump basin and has enough power to keep your basement dry. Besides, if you’re replacing a pump that has served you well in the past, you should go with a newer model of the same brand. Nonetheless, if you’re replacing a sump pump that failed since it could not deal with the volume of water, in that case, we recommend consulting a plumber first to determine whether you need to increase the horsepower or size of the unit.
Although replacing a sump pump is relatively easy, installing it is a more complicated operation for the first time. This usually requires digging a trench and laying and fitting pipes. Besides, installing a sump pump is a major undertaking that will include cutting a hole in your basement’s outer wall to run a drainpipe, drilling a hole into your basement floor with a jackhammer, and installing electrical wiring. Therefore, this is a job best left to a licensed professional or a homeowner with extensive experience in home plumbing. In addition, an improperly installed sump pump can result in water damage and flooding.
Now that we know that it’s possible to replace the sump pump on your own, let’s look at the following steps.
Steps on How to Replace a Sump Pump
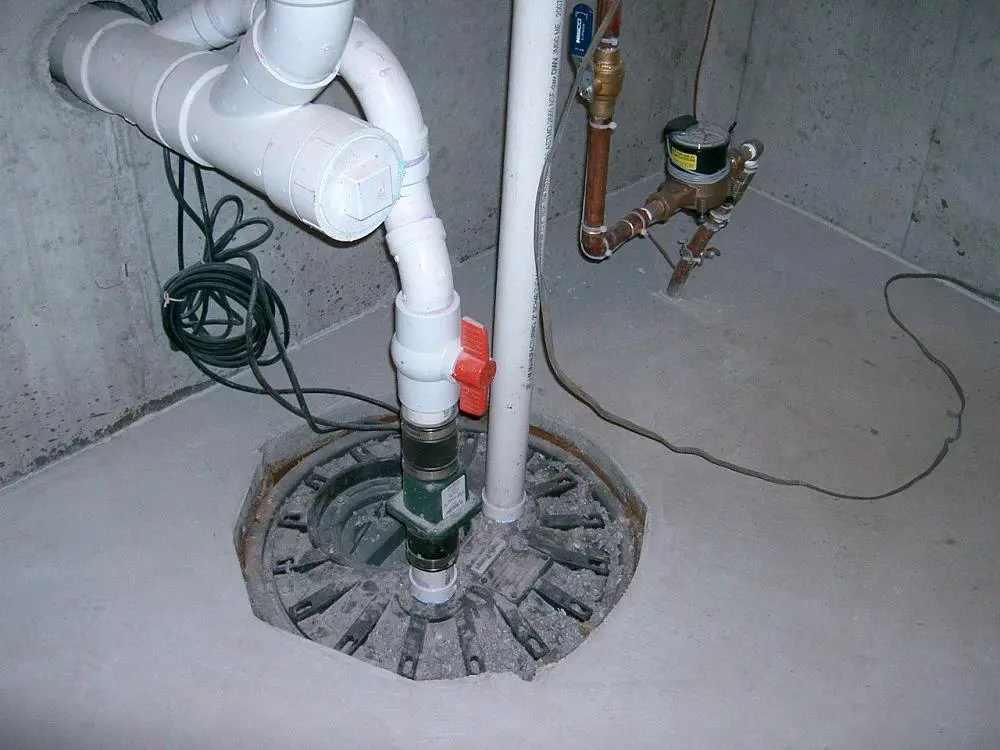
Step 1: Connect the male threaded piece
This step involves a straightforward procedure. First, wrap your threads in tape. When wrapped in a counter-clockwise direction, the tape tends to stay in place when screwed into the fitting. Then, screw it into the sump pump’s fitting. However, avoid over-tightening it since it is cheap plastic and can break if overtightened with channel locks or pipe wrenches.
Step 2: Glue your pipe into position.
Add ABS glue to the pipe and the fitting. Some will recommend doing this step before connecting the male end to the sump pump, and they are also correct. However, doing that will oblige you to wait for about 15 minutes or more before attaching the male end to the sump pump to allow the glue to cure fully. Either way, it’s not a big issue.
Step 3: Remove the old sump pump
Get a towel since you are going to get soaked. Start by removing the old check valve. The check valve’s job is usually to prevent water from flowing back down the sump pipe and creating a siphon (if your septic tank is backed up) or a drain straight into your basement if the outlet pipe is backed up.
That also implies that an 8-foot column of water will be released when you disengage the valve. Therefore, be prepared for it and keep in mind that it may smell bad. Besides, you need to know that valves come in a wide range of shapes and sizes. You will find a valve with four pipe clamps that you must release before disassembling into three sections. Once that’s done, pull the old sump pump out.
Step 4: Start plumbing- if necessary.
When it comes to replacing a sump pump, this step can be optional. Ideally, your pipe should ascend straight and make as few turns as possible. Start by marking and cutting the outlet pipe approximately one inch below the sump pit’s top. After that, connect your first 45-degree elbow.
Step 5: Measure, cut, then connect.
Proceed to measure, cut and connect the pipes until you get to the wall.
Step 6: Install the Check valve
Install your check valve low in the system, near the pump rather than the ceiling. As a result, when the pump is turned off, the water in the pipe will not refill the pit sufficiently to turn the pump back on when it flows back into the pit. That would make your pump would repeatedly switch on and off. Besides, ensure that the check valve is installed so that the water flow can go up but not come back down.
Step 7: Continue plumbing
Connect the outlet pipe to the main drain line at this point. Measure, cut, and connect until you get where you want.
Step 8: Finish
Connect your sump pump and run it through its paces. Fill your pot with water and put it to the test. The unit should be turned on and evacuate the water. You now know how to replace a sump pump on your own!
What Are the Signs that Your Sump Pump Needs Replacement?
1. It’s starting to rust.
Sump pumps are usually exposed to water most of the time, which can cause components rusting. This is especially frequent with older pumps, as many contemporary units are constructed with rust-resistant materials. If there is only a minor bit of rust, you can scrape it away. Nonetheless, extensive rust can eat through components and cause structural weakness in essential components. In this scenario, you should plan a professional repair service.
2. It’s getting jammed or stuck.
Jams are usually common and, in most cases, affordable to fix. You can fix small jams like those caused by accumulated material on your own. Conversely, a dry water pit might cause the unit to become stuck. Therefore, if your location is undergoing a dry period of drought, you can pour some water into the pit to keep it from locking. However, if you’re in a drought and detect a terrible stench, it’s a warning that you need a professional to come out and clean then test your unit.
3. It’s completely dead.
A non-operational unit is a major issue. Unluckily, you are more likely to notice this after a hard rain, which is also when floods and damage are most likely. This severe problem requires expert assistance as soon as possible. Components that have been stuck or burned out may be to fault, or the sump pump may have reached the end of its useful life.
4. It’s making disturbing sounds.
The sump pump in your basement should be rather quiet. A pedestal model will be slightly louder than a submerged unit; however, it should still be largely silent. In either scenario, you will notice if your unit begins to make noises it has never produced before. Conversely, humming might indicate a clogged airlock or a blocked impeller. Loud pounding or clanging, especially in older models, may indicate that extensive repairs or a complete replacement are required.
5. It’s reached the lifespan limit.
Sump pumps usually don’t last forever, and you need to change them at some point. A sump pump has an average lifespan of 7-10 years. Repairs to your home’s pump will likely grow more frequent and more expensive as time goes by. There may come a time when it’s more cost-effective to replace the system rather than continuously repairing it.
6. The wiring is failing.
Sump pumps are usually powered by electricity, and their wiring frequently malfunctions and must be repaired or replaced. Because your sub pump is most likely wired into your home’s electrical system, it’s also vulnerable to shutting off if your power goes out. This can result in a flooded basement and unnecessary strain on the sump pump when it finally goes back. Plumbers usually refer to it as an “overwhelmed sump pump.”
The pressure created by dealing with backed-up water might be so high that it ruins the pump. Most homeowners purchase a backup generator or battery to power the pump to avoid this. A sump pump battery is less than the expense of fixing a burned-out device.
7. It is constantly running
It’s normal for your sump pump to operate more often when it rains, but it shouldn’t have to work 24 hours a day, seven days a week. This usually happens when the pump is trying to keep up with the volume of water. The repair cost is determined by damage extent to the motor and intentions to solve the issue in the future.
The solution might be as easy as purchasing a new float switch. In addition to labor, float switch repair costs between $35-$75. If the motor burns out, you will need to replace it. In this case, a new motor will cost between $60-$200 to have professionally installed. You may wish to install a second pump to avoid this from happening again in the future. The cost of an additional second pump ranges from $100-$500, depending on the style and extent the plumber must dig.


